

Static code analysis
Yohan, our reverse engineering expert, recently came across a new strain of the LOCKBIT program. With a LOCKBIT 3.0 announcement made recently, are we looking at this update, or simply dealing with a copycat group? We are currently analyzing the sample — here are our initial findings. What do you think?
Anti-Debug check
At the start of the program, it checks whether the NtGlobalFlag (`0x70`) flag is set. If so, the binary enters an infinite loop. Otherwise, the binary continues execution.
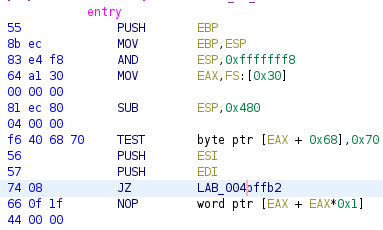
Anti-Debug check
Loading DLLs
The binary loads very few DLLs and functions at startup.
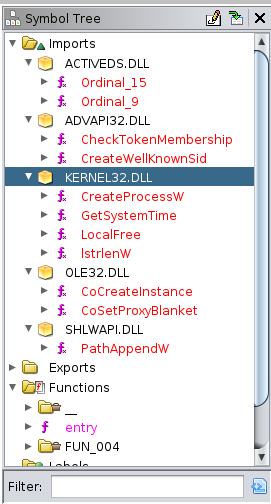
List of DLLs loaded by the program
Continuing through the code, we can see string modifications from the stack.
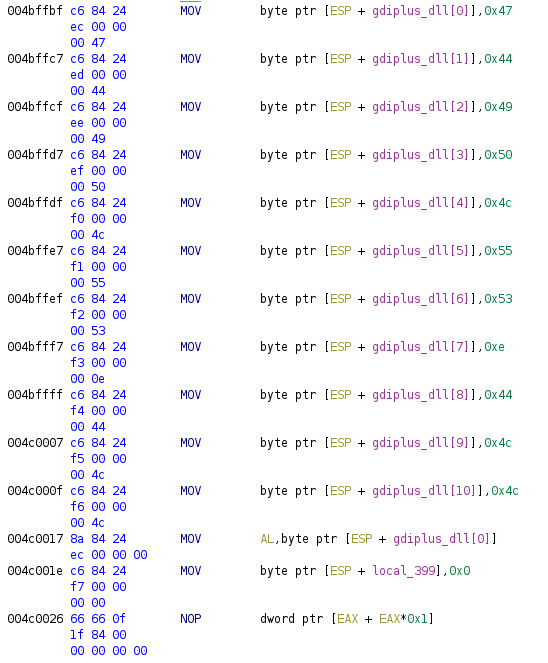
Adding a string to the stack
We then notice that the string is XORed with a static key placed just before the string. For the first string, this key is `0x20`, which we can verify with Python.
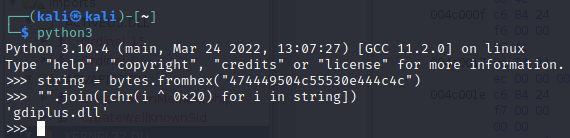
XOR of the string with the key 0x20
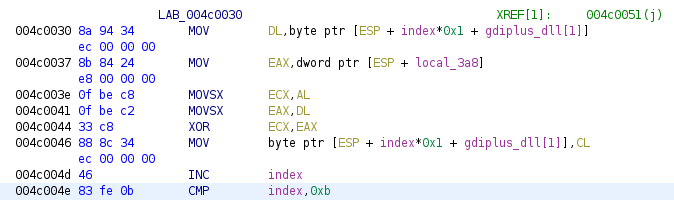
Binary code used to XOR the string
Each DLL name is encoded with different code. The list of encoded DLLs is as follows:- `gdiplus.dll` - `ws2_32.dll` - `shell32.dll` - `advapi32.dll` - `user32.dll` - `ole32.dll` - `netapi32.dll` - `gpredit.dll` - `oleaut32.dll` - `shlwapi.dll` - `msvcrt.dll` - `activeds.dll` - `gdiplus.dll` - `mpr.dll` - `bcrypt.dll` - `crypt32.dll` - `iphlpapi.dll` - `wtsapi32.dll` - `win32u.dll` - `Comdlg32.dll` - `cryptbase.dll` - `ombase.dll` - `winspool.drv`
Dynamic DLL resolution
Once the DLL names are resolved, the binary must dynamically resolve the DLL addresses in order to use the functions. To do this, it first resolves `Kernel32.dll` then `LoadLibraryA` in order to resolve each of the functions.

Dynamically resolving functions
Kernel32.dll
To resolve this DLL, the binary computes an FNV hash of the lowercase DLL name and checks it against a hardcoded string. If the value matches, the DLL's base address is returned.

Checking the DLL name and returning the base address

Result of an FNV hash on the string Kernel32.dll
LoadLibraryA
To resolve this function, the binary performs the same operations. It loops through the functions present in Kernel32.dll, then for each function computes its FNV hash and compares it to a hardcoded value. If the value matches, it returns the function's base address.

Checking the function name and returning the base address

Result of an FNV hash on the string LoadLibraryA
Hands off my language
The binary then retrieves the GetSystemDefaultUILanguage function to check the computer's default language, so as not to encrypt systems with a certain default language.
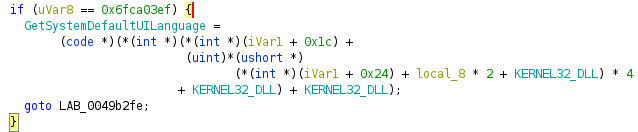
Retrieving the base address of the GetSystemDefaultUILanguage function

Result of an FNV hash on the string GetSystemDefaultUILanguage
The value returned by this function is then compared with integers corresponding to the system's language.

Checking the system language
Based on official Microsoft documentation, it is possible to retrieve the list of languages compared against the variable.
- Azeri (Cyrillic) - Azeri (Latin) - Armenian (Armenia) - Belarusian - Georgian - Kazakh - Kyrgyz (Cyrillic) - Russian (Moldova) - Russian - Tajik - Turkmen - Uzbek (Cyrillic) - Uzbek (Latin) - Ukrainian
If the language is in the list, the binary resolves the ExitProcess function to terminate execution.

Resolving the ExitProcess function

Result of the FNV hash for ExitProcess
Reducing permissions on the process
The binary reduces its own process access permissions by modifying its own access list.
To do this, it resolves the NtOpenProcess function to obtain a handle on its current process and retrieves the permissions via GetSecurityInfo.
Following this, it calls RtlAllocateAndInitializeSid to create a new SID structure in order to call RtlAddAccessDeniedAce and set the EVERYONE group's permissions to ACCESS_DENIED.
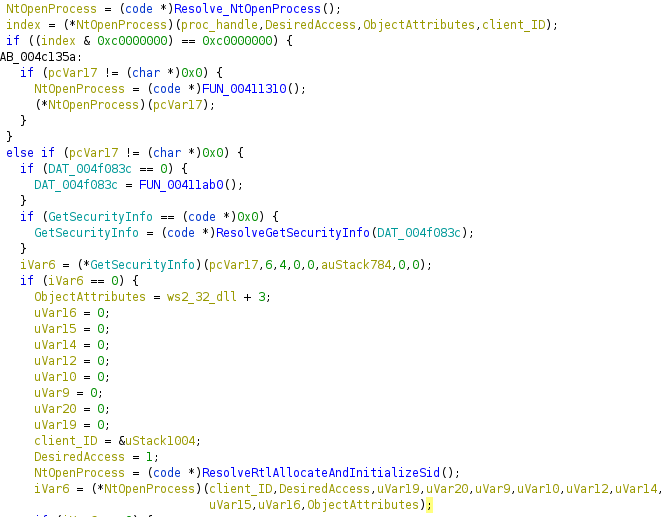
Retrieving permissions on the process
Finally, the binary calls RtlGetAce to go through each ACE and add an ACL via RtlAddAce. The binary then calls SetSecurityInfo to apply all the ACLs and block access to everyone on the process.
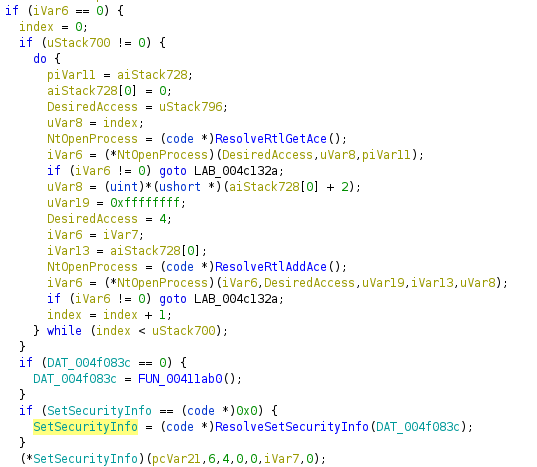
Blocking the process for everyone
Error Stack Trace
The binary uses the NtSetInformationProcess function to block any error message. It uses three flags, as follows:- SEM_FAILCRITICALERRORS - SEM_NOGPFAULTERRORBOX - SEM_NOALIGNMENTFAULTEXCEPT
Blocking error messages
Decoding the configuration
The following function decodes the configuration embedded in the binary.
A simple XOR with the key 0x5F is performed, so it's easy to recover the strings by XORing the entire binary.
After performing the XOR, it is possible to extract an image using binwalk. The image shows the LockBit logo.
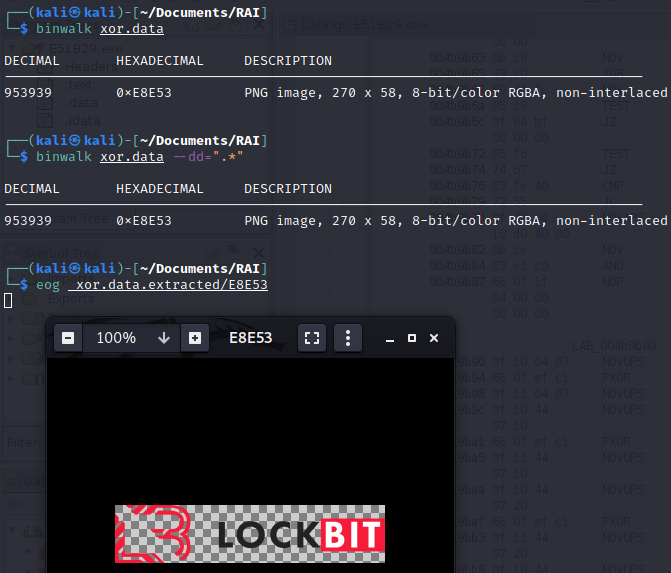
Extracting the image from the binary's configuration
Only one image comes out, yet there are 9 files.- EMF file: Contains the graphic vector for the text "ALL YOUR IMPORTANT FILES ARE STOLEN AND ENCRYPTED"
- EMF file: Contains the graphic vector for "LOCKBIT 2.0"
- A Blender Pro Medium TTF file
- A Proxima Nova TTF file
- The LockBit logo text in PNG
- The LockBit logo in PNG
- A large LockBit logo in PNG
- A process list
- A service list
The binary then counts the number of processes in the list in order to store them in a list.
The configuration itself is stored in a byte list.
If the byte contains 0xFF, the option is enabled; otherwise, the byte value is 0xAA.
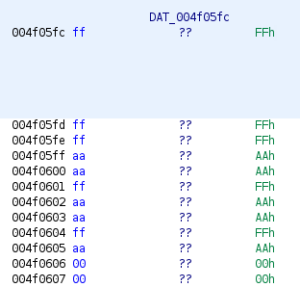
Binary configuration
The list indexes correspond to:
- Index 0: Disabling UAC bypass.
- Index 1: Enabling self-deletion.
- Index 2: Enabling the log page.
- Index 3: Enabling network-based encryption.
- Index 4, 5, 6: If one of these 3 flags is `0xFF`, the binary replicates itself via GPOs.
- Index 7: Setting up a registry key for .lockbit files.
- Index 8: Printing the ransom note on printers.
We note that, unlike samples seen in the wild, this one has a modified configuration.
It does not enable network-based encryption and does not set up a registry key for .lockbit files.
Privilege escalation
To gain full permissions on the current machine, the binary uses a well-known technique called `Juicy Potato` to escalate its privileges. This technique abuses `Golden Privileges` to escalate privileges locally.
Log
The binary then checks whether the Log flag is enabled in the configuration. Since this is not the case in our configuration, I'll skip this part.
UAC Bypass
To bypass UAC, the binary first checks whether it is running as admin, then bypasses UAC via the `ColorDataProxy/CCMLuaUtil` COM interface. This well-known technique can be found on [Github](https://github.com/hfiref0x/UACME/blob/92e84a734c4719a9067f4e9c8cb0e263ae4e06af/Source/Akagi/methods/hybrids.c#L877).
Replication via GPO
If the binary is running as admin and one of the GPO replication flags is enabled, it will then try to replicate itself via GPOs.

Checking permissions and flags to trigger replication via GPO
First, the binary checks whether it is running on Active Directory by retrieving the current computer's name and the Active Directory's name in order to compare the two.

Checking whether the current computer is a DC
If the current computer is not a DC, this part stops and the binary does not attempt to create a GPO.
The binary then retrieves the AD's DNS name as well as the Administrator account name in order to connect to the domain.
Following this, it prepares the string for GPO creation. To do this, it uses the format string `%02X%02X%02X%02X%02X%02X%02X` applied to the public key hardcoded in the program.
This public key is also different from other samples seen in the wild.
Using this string, the binary then connects to the domain.

Creating the string using the format string and connecting to the domain
Continuing on, using the LDAP string formatted just before, the binary creates the GPO in the domain.

Creating the GPO
Once this GPO is created, the binary creates and updates the GPT.INI file.
This file will contain the following formatted string:
```
[General]
Version=%s
displayName=%s
```
The version stored on the stack is XORed, which allows it to be recovered. The value for the version is `2621892`.

Contents of the GPT.INI file
The binary then updates the GPO folder to add the following files:
– \MACHINE\Preferences\NetworkShares\NetworkShares.xml: **Shares all of the server's drives over the network.**
– \MACHINE\Preferences\Services\Services.xml: **Stops a list of services found previously.**
– \MACHINE\Preferences\Files\Files.xml: **Places the binary on the Desktop of every share.**
– \MACHINE\Preferences\ScheduledTasks\ScheduledTasks.xml: **Kills every process from the list found previously.**
– \MACHINE\Registry.pol: **Contains registry keys.**
– \MACHINE\comment.cmtx
The strings for each file are located on the stack and encoded differently each time. For `ScheduledTasks.xml`, the file's content is encoded as follows:

Decoding the string for the ScheduledTasks.xml file
Once the file contents are set up, the program waits one minute before triggering replication.
For replication, the program goes through PowerShell; this string is encoded on the stack then decoded with a simple subtraction.

PowerShell replication command
The binary obviously checks whether the command ran successfully. In case of a problem, it goes through LDAP to send a gpupdate to all machines.
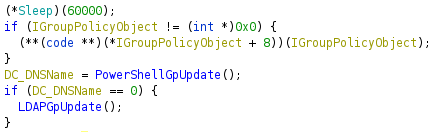
End of the replication function
Deleting Shadow Copies
Once the malware is deployed, it deletes backups so the system can no longer be recovered. To do this, it uses strings encoded on the stack and runs the following commands:- cmd.exe /c vssadmin Delete Shadows /All /Quiet
- cmd.exe /c bcdedit /set {default} recoveryenabled No
- cmd.exe /c bcdedit /set {default} bootstatuspolicy ignoreallfailures
- cmd.exe /c wmic SHADOWCOPY /nointeractive
- cmd.exe /c wevtutil cl security
- cmd.exe /c wevtutil cl system
- cmd.exe /c wevtutil cl application
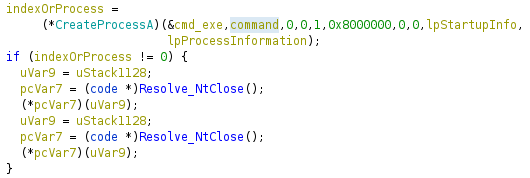
Running each command to delete shadow copies
Printing ransom notes

Launching the function to print the ransom note
For printing, the binary first retrieves all printers on the system using the `EnumPrintersW` function.
Once the list of all printers is retrieved, it makes sure not to print to files by comparing printers against the strings `Microsoft Print to PDF` and `Microsoft XPS Document Writer`.
Once this filtering is done, the binary opens the printer, writes the ransom note content, and closes the printer, for each printer present.
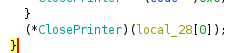
Closing the printer
Encryption process
The binary calls the `FindFirstVolumeW` function to find the first available volume on the machine to start its encryption. It iterates through subsequent volumes with `FindNextVolumeW` to find the available ones.

Iterating to retrieve all volumes
To initialize its cryptographic context, the binary tries to import the `bcrypt` DLL; if it fails, it retrieves the `CryptAcquireContextW` function present in the `advapi32` DLL.
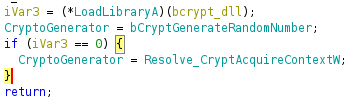
Initializing the cryptographic function
The binary then creates a public/private key pair, using the `Libsodium` algorithm. It encrypts the public key and removes the private key from memory.
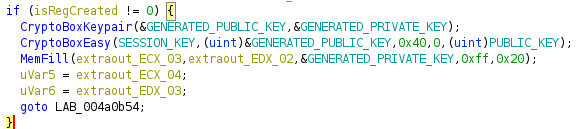
Generation, encryption, deletion
For the final part of its process, the binary calls the `NtCreateIoCompletion` function to speed up its encryption process and spawns as many encryption threads as the CPU has cores.
During its process, the binary avoids encrypting the following folders, files and extensions:
Folders:- $Windows.~bt
- intel
- msocache
- $recycle.bin
- $windows.~ws
- tor browser
- boot
- windows nt
- msbuild
- microsoft
- all users
- system volume information
- perflog
- google
- application data
- windows
- windows.old
- appdata
- mozilla
- microsoft.net
- microsoft shared
- internet explorer
- common files
- opera
- windows journal
- windows defender
- windowsapp
- windowspowershell
- usoshared
- windows security
- windows photo viewer
Files: - ntldr
- ntuser.dat.log
- bootsect.bak
- autorun.inf
- thumbs.db
- iconcache.db
- restore-my-files.txt
Extensions:- .386
- .cmd
- .ani
- .adv
- .msi
- .msp
- .com
- .nls
- .ocx
- .mpa
- .cpl
- .mod
- .hta
- .prf
- .rtp
- .rpd
- .bin
- .hlp
- .shs
- .drv
- .wpx
- .bat
- .rom
- .msc
- .spl
- .msu
- .ics
- .key
- .exe
- .dll
- .lnk
- .ico
- .hlp
- .sys
- .drv
- .cur
- .idx
- .ini
- .reg
- .mp3
- .mp4
- .apk
- .ttf
- .otf
- .fon
- .fnt
- .dmp
- .tmp
- .pif
- .wav
- .wma
- .dmg
- .iso
- .app
- .ipa
- .xex
- .wad
- .msu
- .icns
- .lock
- .lockbit
- .theme
- .diagcfg
- .diagcab
- .diagpkg
- .msstyles
- .gadget
- .woff
- .part
- .sfcache
- .winmd
Self-deletion
Once the encryption process is complete, the program proceeds to delete itself.
To do this, it runs a shell command, again encoded on the stack.

Decoding the self-deletion string
The `fsutil` command is used so that the binary is no longer present on disk once execution is complete. This is much more effective than a simple deletion with the `rm` command, since the file is fully overwritten on disk, leaving no way to recover it with tools once deletion is done.
In addition, it uses the `MoveFileExW` function to tell the system to delete the file after a reboot.
End of execution
The binary resolves the `ExitProcess` function to terminate.
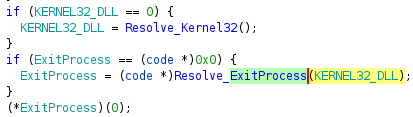
Stopping the binary
Conclusion
Generating a 32-bit key, followed by encrypting the public key with Lockbit's public key and removing the private key from memory, makes the decryption process impossible.
Furthermore, the binary does not communicate with the outside world. It does not send any message and does not connect to any C2. It doesn't need to retrieve any specific information about the encryption, since all the information is stored at the end of the files. This information is, of course, also encrypted.
As for propagation, note that if the GPO configuration is enabled in the binary and you detect a GPO deploying the malware, there's a good chance it was first launched on Active Directory.